
Take a step back in time, and try making scrapbooks that use scraps rather than purchased materials. "This project is super," one mom reports. "It gives the kids their own project so they aren't constantly asking for acid free paper (which can get very expensive when one wrong cut means they are on to the next sheet). Also, with this project, they each have a book so conflicts over 'a' page will be minimal."
Here is what you'll need:
* Five or more brown grocery bags
* Scissors
* Ribbon, about 2 feet for each scrapbook
* Yarn in your hair color
* 9-inch uncoated paper plate
* Markers
* White glue
An upstate New York Mom reported, "When I was at the store all I had to do was ask, and I got a big pile of brown paper bags."
Here's what you do:
* Remove the bottom of the bag by cutting down the seam and around the bottom of each bag.
* Flatten out the brown strips of paper you have left, and stack them.
* Fold the stack of paper in half to form a book. Five grocery bags will give you a book with ten pages.
* Cut two small pieces out of the fold of the bag about six inches apart. Cut a 2-foot piece of ribbon. String one end of the ribbon in through one hole and out through the other hole. Tie the ends of the ribbon together in a pretty bow to hold the pages together.
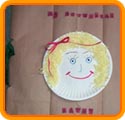
* Use the markers to draw your own face on the "eating" side of the paper plate.
* Cut yarn bits and glue them around the face for hair.
* Add any collage materials to the face you wish. You might want to include a hair ribbon or a paper baseball cap or a collar.
* Glue the plate face to the center of the front of the scrapbook.
* Use the markers or letters cut from printed material to write your name and whatever else you wish on the front of the scrapbook.
Rachel LaClair (9) completed her cover and one page on the first day of the project and "couldn't wait to get going on some more" the next day.
Beth Wells says, "I often have extra photos I won't use in the family books and will pass them along to the kids (three children, ages 7 to 14 years old). I think that as their book grows, it will be its own incentive. Their pride will fuel their enthusiasm."
Tips:
* If you are making one scrapbook for the children to share, make the plate faces from smaller paper plates.
* If you want the scrapbook to have some colorful pages, cover some pages with old wrapping paper in a bright pattern.
* If you'd like to have a special page in your scrapbook for keeping stickers, glue on the backings from such self-stick items as the backings of postage stamp sheets and address labels. You can stick your stickers on the backings and peel them off to use or move whenever you want.
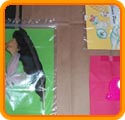
* If you want a page for keeping items to save that you don't want glued in, make a pocket page with a quart-size zip-to-close plastic bag. Cut a sheet of construction paper to fit inside the plastic bag . Put strips of masking tape on the back of the bag to create a better gluing surface. Glue the bag to the page. You can also glue in open envelopes to use as page pockets.
I love Beth's idea for a page for the upcoming fall season. "We have the world's largest leaf pile each fall, and I have taken pictures a couple times. The kids can either use dried colorful leaves as they are turning this fall or cut them out of colored paper. Not only can they frame the photo, but they add texture, and if the kids use the colored paper, a place to write."
TAKE IT FROM ME:
"To have pretty frames to use with photographs, cut the tops from square tissue boxes with colorful prints."